Showing posts with label DIY. Show all posts

Sunday, January 22, 2012

The Beginner's Guide to Pinhole Photography by Jim Shull

Pinhole Photography Cover
Fancy digital SLR cameras are a lot of fun and take great pictures. In this world of continuing advancements in the ease of use and capabilities of all manner of gadgets, it's easy to to forget the simple ideas that had to come first. So much can be learned from revisiting the more primitive implementations of just about any technology. Making and using pinhole cameras and learning about pinhole photography is a fun and valuable experience for any photographer and can be rewarding in its own right.

Jim Shull's 1999 book The Beginner's Guide to Pinhole Photography is a classic in the field. Although it is not the most technical treatment of the subject, it is a perfect introduction to pinhole photography, or—as Shell calls it—"fotography."

Easy Ideas for Pinhole Cameras
Before deciding how to make a first move into the world of pinhole, it is a good idea to read through the entire book. Having accomplished that, the interested reader will know where to comfortably begin. Some outside help in the form of web research to get more specific advice on camera construction would be helpful. You could get really creative and even make a camera out of LEGO.

Santa Barbara Pinhole Camera (Paul Sullivan/Flickr)
After a brief explanation of why a pinhole camera works, basic ideas on constructing a camera are presented. The aperture is of course a critical component of any pinhole camera. It is possible to create an image using a hole poked in the side of a shoe box with a pin, but a good pinhole camera that does not make. Shell provides an excellent method for constructing a good aperture using a thin sheet of brass.

A pinhole camera housing can be made out of just about anything so long as few basic requirements are met. For those unusual cases where a suitable box or can cannot be found, a plan for a camera made out of card stock is included in the back of the book.

Getting Started With Pinhole Photography
Camera in hand, it is time to take and develop some pictures. Oh, and a dark room of some sort will be needed. No worries. Shell gives some practical and useful tips for constructing a simple darkroom, set up with the bare essentials for producing prints.

Pinhole photo with great depth of field (Matt Callow/Flickr)
The author has left plenty up to the photographer. Shell has not provided a detailed step-by-step guide to becoming an expert in the technique and art of pinhole. Some data for aperture diameters, focal lengths, and exposure times are provided. It's just enough information to get started.

A first pinhole camera probably won't be the ultimate. Initial attempts at producing an image may fail and learning to develop film takes some practice. The best way to learn any new skill is to get out and do it and learn from mistakes. This book provides an excellent starting point to begin that journey.

Although it seems to out of print, The Beginner's Guide to Pinhole Photography is available used (at collector's item prices) and there is a good chance a decent-sized library system will have a copy. Thanks to the publisher, it is also available in e-reader editions.

The Beginner's Guide to Pinhole Photography; Jim Shull; Amherst Media, Inc.; Buffalo, NY: 2010

Note: This book review first appeared at Suite101.com.

Saturday, January 21, 2012

The Boy Scientist by the Editors of Popular Mechanics

Cover of The Boy Scientist
Popular Mechanics has been providing entertaining and practical information and advice from the worlds of science and engineering since 1902. The current editors at the magazine have gone through the archives and come up with 160 interesting ideas for projects that could lead to "who knows what" in the fertile mind of a curious youth.

Lab Tools and Techniques

The first chapter includes some useful devices that could very well come in handy for making some of the other projects in the book. Anyone with a small workshop who wants to build stuff will love this section. The simple lead screw fabricated from a small rod, some solder, and copper wire, is a great idea--but what would serve as a lead nut for the screw? Make a pushbutton switch, a Bunsen burner, a simple micrometer, a distillation apparatus -- all very cool!

From Measuring to Making

Once you have tried a hand at some of the helpful devices in the first chapter, it's time to get into the more complex, and arguably more interesting, offerings. The remaining chapters are "Measuring Our World," "Electric Education," "Motorized Investigations," "Chemistry" and "The Physical World." As can be seen from the chapter titles, there is something here for just about any interest.

The projects range from the simple and practical to the specialized and highly involved. On the simple side there is the method of using similar triangles to measure the height of a tree by lying on the ground with feet against a yard stick and sighting over the yard stick to the top of the tree. On the more intricate side there is the telescopic range finder in which the builder must use use skills in wood working, optics, and mechanics.

Of particular note are the basic instructions for making a model steam engine using only hacksaw, bench drill, grinder, files, and taps and dies. A machine shop was called for in fabricating the steam cylinder and fly wheel, but ingenuity could probably provide something that would work for these parts as well.

Have you always wanted to make an electric motor from scratch? Need a hydraulic turbine to turn the motor using a local stream or other flowing water source? You'll find instructions for how do those things and much more in this interesting little book.

Are some of the projects potentially dangerous (like the laboratory gas generator)? Sure! Never mind the danger, think of the fun! But seriously, adult supervision is highly recommended.

A Treasury of Quaint and Ingenious Devices

Anyone in need of some ideas for science projects, or information on how to make useful machine parts and electrical component on the cheap, will find much of interest in The Boy Scientist.
DIY crowd take note--anyone with a penchant for making things or performing experiments will love this book. Like the blurb on the book says "So Much Fun, Not Enough Time!" But who says it has to be limited to the Boy scientist?

References

The Boy Scientist; The Editors of Popular Mechanics; Hearst Books; New York, NY: 2009

Friday, June 4, 2010

30 Days of Creativity- #1

It was a tweet from Make Magazine that got me interested. This gist was this--do something creative every day for 30 days. Sounds cool. I figured I'd sign up (figuratively speaking, you really don't have to sign up). To learn more about the challenge see the 30 Days of Creativity post at the Make blog.

What to do? Well I have been into providing manipulative brain teaser puzzles for the kids in my math classes, so I though it would be good to add to my puzzle collection. After searching around for some ideas I came upon the famous (in some circles at least) Soma Cube. Looks easy enough.
Sponge
Figure 1. A cheap plastic sponge mop refill
The Soma Cube Project

My first idea was to look for some dice to glue together. Couldn't find any. How about foam? Maybe a sponge cut into cubes? Seemed like a good idea. No sponges either. The wife recommended I zip over to the local Big Lots and pick up some cheap sponges. Good idea! So I did. I came back with a sponge mop refill that seemed to have the desired mechanical stiffness to be able to hold its shape (Figure 1).

There are plenty of sites where on can see how to make a Soma Cube. One that works is at Minds in Bloom. That's where I saw how to make the seven shapes. The plan was to cut the foam into cubes, glue them together with super glue and maybe paint them.

Sponge
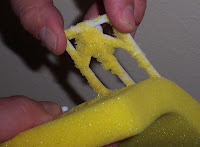
Figure 2. Peeling off the plastic mounting fixture

An initial cut on a table saw to remove the scrub bar from the edge of the sponge worked well. So, buoyed with hope, I carefully (sort of) removed the plastic mounting fixture from the sponge (Figure 2). I figured that would be the side I'd glue on so some damage was tolerable. Then reality set in.

Additional trial cuts on the saw were a failure. The first cut worked because the scrub bar added sufficient mechanical strength to allow the cut to proceed without snagging the sponge and bunching it up in the saw blade.
Sponge
Figure 3. That is one unsuccessful sponge cut

After that, smooth accurate cuts proved impossible (or at least very unlikely--see Figure 3). I have always wanted to build a foam cutter, and that is what it would take to cut a foam plastic sponge into cubes. No time for that now though.

A last ditch effort to save Day 1 found me attempting to to use some wood on hand to cut cubes about 9/16 of an inch on a side. Fail! You can't really make accurate cubes (not quickly at least) that small on  a table saw. A chop saw might work, but I don't have a chop saw.

So much for Day 1. I think I know where I can get some ready-made cubes for a retry on Day 2.

Next Day