Friday, December 24, 2010

30 Days of Creativity - #18-#19

Home Made Guitar Pickups

I have been interested in cigar box instruments for awhile now. Actually I have always been interested in found object as instruments. Once I recorded a song called "Robotics Man" that featured sounds from power tools and some beeps made by touching the ends of a pair multimeter leads together. That was decades ago!

I got it into my mind to make a cigar box instrument  after seeing one that the aforementioned nephew was working on. I also remember seeing John-Alex Mason play one he had made (this was a couple of years ago), and I recall him describing how he made his own pickup for it. I figured if I was going to make my own cigar box guitar, it would be cool and educational to make a pickup too.

You can't make a pickup unless you know how to get started, so my output for today and tomorrow consisted of researching how to make one (maybe a half hour each day?). I found the following resources helpful, although I haven't decided exactly how to proceed.

Make a Guitar Pickup (Instructable)

Make Your Own Electric Guitar Pickup

How to Make  a Humbucking Pickup for Guitar (The Hard Way!)

I'll admit I haven't actually made a guitar pickup even as of the end of 2010, but I have scrounged up most of the materials over time, including a roll of magnet wire I got at an estate sale for $1, so it is on my list of things to do! I think the best place to get neodymium magnets is either eBay or KJ Magnetics. Amazon sells some too.

Previous Day
Next Day

Thursday, December 23, 2010

30 Days of Creativity - #17

Music

I had already written the lyrics to "Non-Linear Dude (see Day #13) and had piddled around with some music for it. I finalized that (more or less) on this day. Then I went to my nephew's house to jam and do a little recording.

He is a songwriter and guitar player and we occasionally gt together and talk about doing some open mics together. So far its ll talk, but we still keep talking about it. On this particular day, I made a demo recording of "Non-Linear Dude" and we worked together on a few other things, including an acoustic version of "Sweet Jane."

We also worked on a song together. He always has some music he has been working on so I threw out a few lyrics and we took it from there. We even wrote them down somewhere. It was tentatively called "Rot Gut Highway" and the first few lines went something like:
Travelin' down a broken highway
The side of the road all covered with bones
Picked up a dog that was headed my way
Threw him in in the back and kept on goin'
Uh-huh.

We even recoded part of it. Come to find out later, that his computer crashed and as far as I could understand, all the work is gone. Oh well.

Previous Day
Next Day

Sunday, September 12, 2010

30 Days of Creativity - #14 - #16

Experiments with Colored Pencils

There I was in a hotel room in Orlando Florida. It was the first day of the Model Schools Conference put on by the International Center for Leadership in Education. I had come prepared with some art supplies, since I knew it would be otherwise hard to keep rolling with this 30 Days of Creativity project while on the road.

I also crazily packed a little cardboard robot model my daughter recently gave me as a gift, but I admit to not working on it at all while I was there. I was able, however, to experiment with some colored pencils and old yellow paper.

Figure 1. A first colored pencil piece
When it comes to art, my talents (if any) tend to be in the abstract realm. I had recently been playing around with ideas for how to incorporate recycled toilet paper rolls in an art project. One idea I played with a little was to cut the rolls open and attach them together to make a painting surface, create a painting, then disassemble the pieces and rearrange them in a new way. So, I decided to test some ideas that I thought might work for an eventual painting for this project.

Unfortunately, I neglected to sharpen my colored pencils before I came! I pressed on anyway and used whatever ones I could to get some sort of a line on the paper to create the swirly thing shown in Figure 1. That was my first night's work.

Sharpen Those Pencils!

The next night I made my way down to the lobby and looked around the business center for a pencil sharpener. No luck. What kind of a business center in a major hotel doesn't have a pencil sharpener? Plan B.

Figure 2. Drawing is better with sharp pencils
I approached the registry desk and asked one of the employees if they happened to have a pencil sharpener I could use. One of the kind persons went to the back office area and returned with a basic electric model. She plugged it in for me and I proceeded to sharpen away. I was able to get about 90% of them sharpened before the sharpener seized and would sharpen no more.  I returned the device with a "thank you," pretty certain it would come back to life once it cooled. Back to the room.

More Experiments With Colored Pencil


That evening and the next, I tried variations on the theme I had begun the night before (Figures 2-5). These came out better since the pencils were sharp(er).

Figure 2 was really nothing more than a test of how smoothly I could move the pencil tip over the surface of the paper. It is really quite amazing how the brain and hand can improve the performance of such a simple task in a short time. By the time I was done, my movement was much more steady and he sweep of eth curves much smoother compared to when I started

Figure 3. Use of overlapping lines

Figure 3 is okay. It included a deliberate crossing of one swoop over another. just to guage the appeal of that effect.

These are just free form experiments with colored lines. It was a lot of fun and I am sure I learned something from the process, although exactly what is hard to say. Just because I can't quantify it, or pin it down, doesn't mean it doesn't have some value. At least to me.

I like Figure 4. This included a deliberate attempt (only partially successful) to not allow any of the swoops to cross over each other. I added some background to it just to see what effect it would have on the overall look. It seems to work.

Of these I do not much care for Figure 5. It looks too mechanical; like it was drawn with a machine of some sort. It's like something produced by a Spirograph.
Figure 4. Trying not to cross the lines

Great art? Probably not. But, interesting enough to make me think something along these lines, done in more vibrant colors with acrylic paint, would work well for the toilet paper roll piece I had in mind (more on that later). 
Figure 5. A spiral, more symmetrical design

Previous Day
Next Day

Saturday, September 11, 2010

30 Days of Creativity - #13

Song Writing

I have had a few lines of a song floating around in my head for, oh, I'm guessing probably about a year now. I decided (not having any other ideas at the moment) to sit down and try to use that kernel of an idea to write a full fledged lyric. You know saying, attributed to Chuck Close —"Inspiration is for amateurs. I just show up and get to work." The name of the song is "Non-Linear Dude".

Non-Linear Dude

Sitting in a corner, staring at lines on a page
Does it go up? Does it go down?
Why don't it ever, com back around?
I wish I woulda' payed attention that day

Rise over run, or is it run over rise?
Δy over Δx, all they said was "follow the steps"
They said it's  easy but ...
Might as well be fighting a T. rex

                    (bridge)
Some day soon, I'll be on a job interview
The manager will shake my hand, say "how do you do?"
She'll ask about my future plans, what I wish for and hope
Pretty sure she won't ask me, if I can calculate a slope
                    (end bridge)

The world keeps on turnin', there's  a constant rate of change
y = mx + b, I can count to ten, I can't count to b
What the hell is m?
Not sure what quadrant I'm in

They say I got to understand, the equation, table and graph
Been' tryin' to find the y-intercept, try as might, ain't found it yet
I might as well go out and play
Cuz I ain't never gonna' use this anyway


Sitting in a corner, staring at lines on a page
                    (fade)

Yeah I'm a math teacher. I guess this song reflects my frustration about the disconnect between what kids need to learn  (invention, creation, and "how to learn"), instead of what is usually taught, which is to be rule and procedure followers.


Previous Day
Next Day

Tuesday, September 7, 2010

30 Days of Creativity - #12

Paper Crafts

Figure1. Starting an origami triangle
Today was a day to try some paper crafts. I had recently gotten a couple of books from the library—one on paper tessellations and one on origami. It was time to try something from each. It ended up being  a family affair, with my daughters trying their hands as well.

Origami Triangle, Origami Pyramid

Not being in an overly ambitious mood, I made a simple triangle out of a square piece of paper (Figure 1). Big whoop. Realizing that was not very impressive, I proceeded to a three sided pyramid. Big Whoop!

Tessellated Paper

Figure 2. Old and interesting gummed paper
This was actually more interesting, and was tackled by the girls. I had recently obtained some very interesting gummed paper at an estate sale and hadn't come up with a legitimate gummy use for it yet, so we figured, "what the heck." It has an interesting fuzzy texture, but turned out not to be ideal for the purpose (Figure 2). It does not hold a crisp edge, which is necessary to get a large number of precise folds into it. I also tears too easily.

But, somehow they got it to work and produces the attractive curved shape shown in the middle of figure 3. Figure three also shows the origami pyramid.

Figure 3. Triangle, tessellation, and pyramid

The tessellation book recommends mulberry paper, which apparently is very tough and holds a crease well. It also happens to be fairly expensive (although you can get a deal on some on eBay). If we ever decide to get seriously into tessellating paper (not likely) it would be worth the investment. Some of the creations shown in the book are pretty amazing though.


References

Montroll, John; Origami Polyhedra Design; Wellesley, MA: A K Peters, 2009

Gjerde, Eric; Origmi Tessellations: Awe-inspiring Geometric Designs; Wellesley, MA: A K Peters, 2009

Next Day
Previous Day

Tuesday, August 31, 2010

30 Days of Creativity - #11

Waxing a Walking Stick

I was pretty desperate for something on this, day eleven of my 30 days of creativity. Fortunately, I was able to come up with something. The previous project (Moleskine-like notebook) involved the use of some beeswax that I had previously misplaced. Now that I knew where it was, I could put the final finish on a project I started over six months ago.

Figure 1. Rubbing on beeswax
Some years back, I had collected some branches from a willow tree growing near a pond in Falcon, Colorado. These branches are relatively straight and are now well-seasoned. They are just about the right diameter and length to be made into walking sticks. I have made two such walking sticks, the most recent one earlier in 2010. All it needed was some kind of a finish coat.

Figure 1. Melting beeswax with a heat gun

I prefer natural finishes on my walking sticks and previously had good results with beeswax. I think I read about doing that in a book somewhere. The beeswax feels good in the grip (ever so slightly sticky, but not too much) and gives the wood a subtle but pleasant luster. Sooooo, I got out the old beeswax and rubbed it all over the surface of said walking stick. It almost looked good. Almost.

Figure 3. Willow walking stick
Heating the Beeswax

You see, cold beeswax does not spread evenly on wood so the surface of the stick was covered with little globules of wax. Rubbing the stick hard with the palm of my hand to warm the wax did distribute it a little better, but not very well.

It was some time later (a couple of months) that I hit upon the way to get it to look good. I heated the wax with a hot air gun and that melted it it right away, distributing it evenly and in a very thin coat all over the stick. This heating process darkened the wax it slightly too, giving the walking stick a nice warm look. Done.

I might even make some more of these and sell them for ten or twelve bucks on Craig's List. I must have at least a dozen more branches of suitable dimensions for some pretty cool walking sticks.

Since revisiting my willow supply I have also tried turning willow on a lathe and it comes out well. It is light and easy to work material.

Sunday, August 29, 2010

30 Days of Creativity - #8, #9 and #10

Sounds easy doesn't it? Make something everyday for 30 days. Sheesh! (Note: My posts went into a hiatus because my images stopped uploading, but now they are working again).
The Moleskine-like Notebook Project

I love my 32-page Moleskine notebook. Is that pronounced like "skin" or like "skyne"? I don't know. I've seen several described projects for making various kinds of notebooks. I had previously stashed away some materials with which to make one, so today is the day I begin.

Figure 1. Notebook cover cut from an old grade book
I began by tracing the outline of my trusty Moleskine onto a piece of vinyl-like plastic materiel I salvaged from a no-longer-used teacher grade book. In a world of computer grade-keeping does anyone use those anymore? It was probably several months ago I was cleaning up and found it and immediately recognized that that material was ideal for making a notebook cover.

After tracing the shape I cut it out with scissors and free-handed the rounding of the corners. Looks okay!

Using the same Moleskine original cover I layed out a pattern for the pages on a piece of ghost grid archival graph paper for scientists and engineers that I had purchased at an Edward Tufte seminar several years ago. Good stuff that.
Figure 2. The cover material, paper and a Moleskine notebook
to use as a model.

Cutting the paper was tricky because it is hard o get them all the same size when cutting free-hand, and the edges get sort of rough when trying to cut too many at once with less-then-sharp scissors. I have no paper cutter. Again I free-handed the rounding of the page corners, with less than stellar success but I am not done yet!

Figure 3. Drilling the binding holes.
After putting the pages and the cover together I set it up on  drill press and drilled holes for the string to pass through for the binding. I used some black hemp cord coated with beeswax and a curved needle to run the thread through the holes. This comes out looking quite similar to the Moleskine binding, but the hemp I used is a bit thicker. A thinner hemp cord would work better.

All in all, it is a pretty reasonable substitute for a Moleskine and I think it will serve well as a highly portable pocket note keeping device.

Figure 4. Sewing the binding with waxed hemp cord.
Figure 5. The notebook compares well with a real Moleskine.

Next Day
Previous Day

Thursday, June 10, 2010

30 Days of Creativity - #7

Progress has slowed. However, I have done a few things in preparation for upcoming projects. One problem I have to deal with is the fact I will be traveling to a conference soon and will have to have some sort of portable project(s) to keep the creativity plan going for several days away from home.

Soma Cube Project

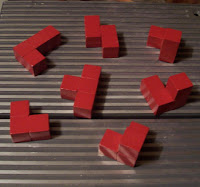
Today I put on two coats of clear acrylic as a final finish (Figure 1). They came out pretty well. Nice and shiny. And red. To top it off I solved the puzzle (Figure 2). It took me about three minutes. Maybe I just got lucky.

Finished Soma Cube Pieces
Figure 2. Finished pieces of the Soma Cube
Assembled Soma Cube
Figure 2. Assembled Soma Cube


Blogging

On a related note (sort of) I have figured out how to add captions to images in Blogger (see Figures 1 and 2!). There is a lot of information about how to do this on the web. Some ideas work, and some don't so I figure it might be helpful to write a clear explanation of a couple of ways to do it that definitely work. That will be written up elsewhere.

Monday, June 7, 2010

30 Days of Creativity - #6

The Soma Cube Project

It's almost done! Today I put two more coats of red paint on the pieces. Tomorrow I will put on a couple of coats of clear acrylic and it should be ready to solve!

Blogging

Today was the day I got the right sidebars on this blog set up pretty close to the way I want them.

Not much else. It still counts!

Sunday, June 6, 2010

30 Days of Creativity - #5

The school year is over and I should have more time to do fun stuff now!
The Soma Cube Project

Okay the primer is on. It's oil based light gray paint from a spray can. That stuff is amazing because it has been on the shelf for at least five years and it's still good. However, the topcoat red is not oil based. I do not think that will be a problem so long as I let the primer dry well before applying the finish coats.

I put on two coats so the graininess of some of the wood surfaces would not be so obvious. The paint also tends to fill some of the gaps between the cubes as well. Dang I forgot to take a photo of the primed pieces!

Technical Writing

Writing is also a creative process, even it it is non-fiction writing. I recently became a feature writer at Suite101.com for the science/tech books section. That means I have an obligation to post four articles a month that somehow relate to science/technical books. So far so good. I wrote up a review of Quantum Leaps by Jeremy Bernstein. Overall, I liked it.

As a Feature Writer, I also get a blog there as well. If you've got blogs use 'em I say. I wrote a piece on a pretty good technical book series called What Every Engineer Should Know. Good stuff in that series. In blogs you get to be quite a bit more creative in your writing style than you do when writing a book review to conform to site style. Does this count as part of 30 Days of Creativity? You bet!

Sixty Days in a Library

Here is a long-term personal learning project that I started today. It involves lots of reading and research, but the creative part for the purposes of 30 Days of Creativity is that I wrote a blog post about it. In Sixty Days in a Library I outline my plan to become skilled in the art and science of information theory with application to problems in biology. You should try something like this too!

30 Days of Creativity - #4

And it continues on Day 4...
The Soma Cube Project

Today I tried to paint the seven pieces of the Soma Cube. It's been awhile since I pained anything. Which explains why it did not turn out very good. The purple base color is too hard to cover with the red spray paint I chose. It's going to need a coat of primer. Duh!

Too late in the evening to do anything on that now. I'll let the crummy red coat dry overnight and then put on the primer tomorrow.

I Made This Blog

Today was also the day I set up this blog to start looking like I wanted. This involved editing a PSD file in the header to get the blog title to say "Sci-Tech Stuff" and then I had to upload it to a server and then figure out where in the template to reference it since the instructions at the place where I got the template were clearly wrong. No biggie. Still some work to do in the sidebar, but it's a start.

Day #5 is next.

30 Days of Creativity - #3

Here on Day 3 of my adventure I have accomplished several things. Note: It is too stressful to try and make a post each and every day, so I record what I am doing and make the posts when I can. Today is the 6th of June and I am actually six days into this 30 Days of Creativity.
The Soma Cube Project

Today I touched up the sanding on my 27 unit cubes and then glued them together with some good quality wood glue. Hopefully they will withstand the abuse of 11-13 year-olds that they will be subjected to. I'm letting the glue set overnight for good strength before continuing with finishing.

The Broken Weight Problem

Today was also the day I finally solved a number problem I have been working on. It was "The Broken Weight Problem" which I saw posed at a good blog called The Math Less Traveled. It took me awhile and, although I did not ask for one, I was inadvertently given a hint. No need to recount the entire experience here, as I have done so in some detail in The Broken Weight Problem at Mister McIntosh Says.

There is certainly a creative aspect to mathematics. It's about patterns and relationships. As stated so well by Paul Lockhart in his Mathematician's Lament, pure mathematics is certainly as much an art as a science. Certainly math has practical applications, but it is at its best when done just for fun.

What Others Are Doing

Hey I just discovered a website called 30 Days of Creativity. People are posting all kinds of stuff they do there. From what I have seen there, it looks like people have a broad definition of what it means to "create" something. Good, so do I.

Maybe I'll post my Soma Cube there when it's done. I suppose I'll have to actually solve it too. There are so many ways to solve it, surely I can find just one.

On to Day #4

30 Days of Creativity - #2

On Day #1 I had achieved total failure in attempting to make a Soma Cube. Then again, the only experiment that is truly a failure is one from you you learn absolutely nothing. I did learn two things (1) you can't expect to cut foam on a table saw; and (2) it is difficult to properly make small cubes on a table saw.
The Soma Cube Project

So I rounded up ready-made cubes from school. I figure this is a perfectly legitimate diversion of property since the main use for this puzzle is to stimulate the brains of middle schoolers.

I brought home 27 purple cubes and arranged them in accordance with the pictures at Minds in Bloom. I then sanded the sides that would be glued together so the glue joints would be stronger. That is all I had time for today! (But, I did do some reading that had some relevance to planning for  future project. More on that later)

One thing that bugs me is the difficulty of adding captions or other annotations to images in iPhoto. Of course I am using an older version. Must try something else. My iMac is a G5 so I can't run Picassa (Intel only). Dang! I have downloaded Gimp, but I have to scrape up my system disk from somewhere to install X11 before that will work. It's always something!

On to Day #3.

Friday, June 4, 2010

30 Days of Creativity- #1

It was a tweet from Make Magazine that got me interested. This gist was this--do something creative every day for 30 days. Sounds cool. I figured I'd sign up (figuratively speaking, you really don't have to sign up). To learn more about the challenge see the 30 Days of Creativity post at the Make blog.

What to do? Well I have been into providing manipulative brain teaser puzzles for the kids in my math classes, so I though it would be good to add to my puzzle collection. After searching around for some ideas I came upon the famous (in some circles at least) Soma Cube. Looks easy enough.
Sponge
Figure 1. A cheap plastic sponge mop refill
The Soma Cube Project

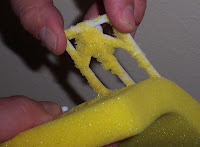
My first idea was to look for some dice to glue together. Couldn't find any. How about foam? Maybe a sponge cut into cubes? Seemed like a good idea. No sponges either. The wife recommended I zip over to the local Big Lots and pick up some cheap sponges. Good idea! So I did. I came back with a sponge mop refill that seemed to have the desired mechanical stiffness to be able to hold its shape (Figure 1).

There are plenty of sites where on can see how to make a Soma Cube. One that works is at Minds in Bloom. That's where I saw how to make the seven shapes. The plan was to cut the foam into cubes, glue them together with super glue and maybe paint them.

Sponge
Figure 2. Peeling off the plastic mounting fixture

An initial cut on a table saw to remove the scrub bar from the edge of the sponge worked well. So, buoyed with hope, I carefully (sort of) removed the plastic mounting fixture from the sponge (Figure 2). I figured that would be the side I'd glue on so some damage was tolerable. Then reality set in.

Additional trial cuts on the saw were a failure. The first cut worked because the scrub bar added sufficient mechanical strength to allow the cut to proceed without snagging the sponge and bunching it up in the saw blade.
Sponge
Figure 3. That is one unsuccessful sponge cut

After that, smooth accurate cuts proved impossible (or at least very unlikely--see Figure 3). I have always wanted to build a foam cutter, and that is what it would take to cut a foam plastic sponge into cubes. No time for that now though.

A last ditch effort to save Day 1 found me attempting to to use some wood on hand to cut cubes about 9/16 of an inch on a side. Fail! You can't really make accurate cubes (not quickly at least) that small on  a table saw. A chop saw might work, but I don't have a chop saw.

So much for Day 1. I think I know where I can get some ready-made cubes for a retry on Day 2.

Next Day