Monday, January 30, 2012

Quantum Leaps by Jeremy Bernstein

Not a typical quantum mechanics book, this is a personal narrative from an insider who knew the people working at the cutting edge of 20th century physics.
Cover of Quantum Leaps
Jeremy Bernstein is the author of many books, including Plutonium: A History of the World’s Most Dangerous Element; Oppenheimer: Portrait of an Enigma; Albert Einstein; Cranks, Quarks, and the Cosmos and A Theory for Everything. He wrote for the New Yorker for more than 30 years.

His scientific career has taken him to such renowned places of learning and research as the Institute for Advanced Study, Brookhaven National Laboratory, CERN, Oxford, the University of Islamabad, and the Ecole Polytechnique.

The Quantum World

In Quantum Leaps, Bernstein takes the reader on a personal journey through the world of physics and the struggle to understand the behavior of matter at very small scales. In the macroscopic world it is, for all practical purposes, perfectly adequate to model the motions, actions and reactions of objects in accordance with the laws laid out by Isaac Newton, eg. force equals mass times acceleration (F=ma).

However, at the atomic level (and smaller) things get weird. So weird in fact, that our ability to understand them in commonly experienced everyday terms fails miserably. This book is mostly about the physicists who developed the quantum theory of matter. Bernstein met quite a few of them and weaves his own personal anecdotes from the world of big-time physics in with what is mostly a historical perspective.

A Shaky Start

The book gets off to a questionable beginning with a meandering and unfocused couple of chapters. Frankly it's kind of hard to tell what the point of the book is. Bernstein mentions that the famous Neils Bohr was a terrible lecturer, often mumbling and getting sidetracked during his presentations.

It is almost as if Bernstein is channeling Bohr then, as he jumps from one anecdote to another, mentioning a meeting here and an idea there, and then suddenly skipping over to a controversy on a tangentially related topic. Fortunately, Bernstein's reputation as a master explainer and science writer is confirmed by the material that follows this rather disappointing beginning.

The Real World of Physics

After struggling through the first 50 pages or so, the reader is rewarded by an interesting and entertaining account that seems to exist on two branches. In one sense, the book is biographical in nature, as Bernstein recounts his early years at Harvard as both an undergraduate searching for something to do and a graduate student who, for a time, is still searching for the "right thing." The right thing turns out to be physics.

Bernstein provides an interesting running commentary on the ideas of David Bohm and John Stewart Bell. Both of these men made important contributions to the development of quantum theory, although not everyone agrees that their ideas are helpful. Most of the big names in 20th Century physics make an appearance. Einstein, Oppenheimer, Dirac, Heisenberg, Schrodinger, the aforementioned Bohr, and many others are all here.

This isn't a book from which to learn a lot about the nuts and bolts of quantum physics. It is however, a fascinating look at how real science progresses from one idea to the next, as the thoughts of many great thinkers jostle with difficult ideas and try to understand and explain what is essentially unobservable (in the direct sense) and virtually unexplainable. Science is a messy affair; people disagree on the interpretation of experiments and some ideas that are initially ridiculed are eventually accepted. That is how it really is.


Bernstein, Jeremy; Quantum Leaps; Cambridge, MA: Harvard University Press, 2009

Sunday, January 22, 2012

The Beginner's Guide to Pinhole Photography by Jim Shull

Pinhole Photography Cover
Fancy digital SLR cameras are a lot of fun and take great pictures. In this world of continuing advancements in the ease of use and capabilities of all manner of gadgets, it's easy to to forget the simple ideas that had to come first. So much can be learned from revisiting the more primitive implementations of just about any technology. Making and using pinhole cameras and learning about pinhole photography is a fun and valuable experience for any photographer and can be rewarding in its own right.

Jim Shull's 1999 book The Beginner's Guide to Pinhole Photography is a classic in the field. Although it is not the most technical treatment of the subject, it is a perfect introduction to pinhole photography, or—as Shell calls it—"fotography."

Easy Ideas for Pinhole Cameras
Before deciding how to make a first move into the world of pinhole, it is a good idea to read through the entire book. Having accomplished that, the interested reader will know where to comfortably begin. Some outside help in the form of web research to get more specific advice on camera construction would be helpful. You could get really creative and even make a camera out of LEGO.

Santa Barbara Pinhole Camera (Paul Sullivan/Flickr)
After a brief explanation of why a pinhole camera works, basic ideas on constructing a camera are presented. The aperture is of course a critical component of any pinhole camera. It is possible to create an image using a hole poked in the side of a shoe box with a pin, but a good pinhole camera that does not make. Shell provides an excellent method for constructing a good aperture using a thin sheet of brass.

A pinhole camera housing can be made out of just about anything so long as few basic requirements are met. For those unusual cases where a suitable box or can cannot be found, a plan for a camera made out of card stock is included in the back of the book.

Getting Started With Pinhole Photography
Camera in hand, it is time to take and develop some pictures. Oh, and a dark room of some sort will be needed. No worries. Shell gives some practical and useful tips for constructing a simple darkroom, set up with the bare essentials for producing prints.

Pinhole photo with great depth of field (Matt Callow/Flickr)
The author has left plenty up to the photographer. Shell has not provided a detailed step-by-step guide to becoming an expert in the technique and art of pinhole. Some data for aperture diameters, focal lengths, and exposure times are provided. It's just enough information to get started.

A first pinhole camera probably won't be the ultimate. Initial attempts at producing an image may fail and learning to develop film takes some practice. The best way to learn any new skill is to get out and do it and learn from mistakes. This book provides an excellent starting point to begin that journey.

Although it seems to out of print, The Beginner's Guide to Pinhole Photography is available used (at collector's item prices) and there is a good chance a decent-sized library system will have a copy. Thanks to the publisher, it is also available in e-reader editions.

The Beginner's Guide to Pinhole Photography; Jim Shull; Amherst Media, Inc.; Buffalo, NY: 2010

Note: This book review first appeared at Suite101.com.

Saturday, January 21, 2012

The Boy Scientist by the Editors of Popular Mechanics

Cover of The Boy Scientist
Popular Mechanics has been providing entertaining and practical information and advice from the worlds of science and engineering since 1902. The current editors at the magazine have gone through the archives and come up with 160 interesting ideas for projects that could lead to "who knows what" in the fertile mind of a curious youth.

Lab Tools and Techniques

The first chapter includes some useful devices that could very well come in handy for making some of the other projects in the book. Anyone with a small workshop who wants to build stuff will love this section. The simple lead screw fabricated from a small rod, some solder, and copper wire, is a great idea--but what would serve as a lead nut for the screw? Make a pushbutton switch, a Bunsen burner, a simple micrometer, a distillation apparatus -- all very cool!

From Measuring to Making

Once you have tried a hand at some of the helpful devices in the first chapter, it's time to get into the more complex, and arguably more interesting, offerings. The remaining chapters are "Measuring Our World," "Electric Education," "Motorized Investigations," "Chemistry" and "The Physical World." As can be seen from the chapter titles, there is something here for just about any interest.

The projects range from the simple and practical to the specialized and highly involved. On the simple side there is the method of using similar triangles to measure the height of a tree by lying on the ground with feet against a yard stick and sighting over the yard stick to the top of the tree. On the more intricate side there is the telescopic range finder in which the builder must use use skills in wood working, optics, and mechanics.

Of particular note are the basic instructions for making a model steam engine using only hacksaw, bench drill, grinder, files, and taps and dies. A machine shop was called for in fabricating the steam cylinder and fly wheel, but ingenuity could probably provide something that would work for these parts as well.

Have you always wanted to make an electric motor from scratch? Need a hydraulic turbine to turn the motor using a local stream or other flowing water source? You'll find instructions for how do those things and much more in this interesting little book.

Are some of the projects potentially dangerous (like the laboratory gas generator)? Sure! Never mind the danger, think of the fun! But seriously, adult supervision is highly recommended.

A Treasury of Quaint and Ingenious Devices

Anyone in need of some ideas for science projects, or information on how to make useful machine parts and electrical component on the cheap, will find much of interest in The Boy Scientist.
DIY crowd take note--anyone with a penchant for making things or performing experiments will love this book. Like the blurb on the book says "So Much Fun, Not Enough Time!" But who says it has to be limited to the Boy scientist?

References

The Boy Scientist; The Editors of Popular Mechanics; Hearst Books; New York, NY: 2009

Wednesday, November 2, 2011

Get Your Apps Back after an iOS 5 Update

Photo by John Karakatsanic via Flickr
I took the plunge and updated my iPad 2 to iOS 5 today. It took about 3 hours which included a few setup steps, updating over half my apps, and getting the apps reinstalled on the iPad.

It seems like there ought to be a better way, but all your purchased apps are erased from the iPad during the process. Depending on how your settings are in iTunes, you may or not get them back after your first re-synch. Mine weren't there. A quick web search was not very helpful and found basically two suggestions: (1) re-synch the iPad; and (2) re-download your purchased apps one at a time from the app store.

A lot of the comments at the places I visited seemed to harsh on Apple because people couldn't get their apps back. Lots of complaints but no solutions. I had the same problem. My apps did not reinstall when I synched either, but I have been using Apple stuff long enough to know that this really ought to work pretty easily. The solution was simple.

These steps apply to Mac OS 10.6 (Snow Leopard) and iTunes 10.5. All you have to do is:
  1. Plug your iPad into your computer.
  2. If iTunes does not launch automatically (because you do not have it set to), launch it.
  3. Click on the iPad icon on the left side panel in iTunes.
  4. Click the Apps tab at the top of the iPad screen.
  5. Take a moment or two to rearrange your apps on the iPad springboard as needed.
  6. Check the Synch box (mine wasn't checked).
  7. Synch the iPad and all the apps will be reinstalled on your iPad.
Now that wasn't so hard was it?  Maybe some people really do have a problem getting their apps back after a major update. But, I'll bet they just don't have their settings right in iTunes. Let me know if this helped you.

Tuesday, October 18, 2011

Repairing a Worn Vacuum Cleaner Rotary Brush Mount

Figure 1. Removing the damaged brush end retainer
We have this old vacuum cleaner that was formerly used by the custodial staff at the Broadmoor Hotel. And no, we didn't steal it, it was purchased fair and square at one of the auctions that the hotel holds every so often. It has done a good job for many years and I'm guessing the thing must be around 20 years old by now. It still sucks up crud, so what the heck—keep using it.

Unfortunately, it started making a humongous racket and leaving dark marks on the floor. After checking it out, it appeared the marks were made by the belt coming in contact with the floor and that was happening because one of the end retaining brackets for the rotary brush was damaged allowing the brush to wobble around and get out of position.

We like this machine and didn't want to get rid of it so I devised a fix. I imagine that similar problems develop on just about all makes of upright vacuums, so why not share my way of fixing it?

Vacuum Brush Mount Repair Procedure

Step 1. Remove the vacuum cleaner bottom cover, unhook the belt from the drive mechanism, and pull out the rotary brush.

Step 2. Figure 1 shows one of the end brackets that keeps the brush in position. The damaged part on the right side is removed using a chisel. It was supposed to be a mirror image of the left side, but it was all torn up and not keeping the brush end in place.

Figure 2. Rough cutting an aluminum retainer piece
Step 3. Fabricate a retainer piece out of aluminum stock by cutting it to size with a hacksaw and dressing it to final shape with a file (Figure 2). The retainer does not have to be fancy. I chose aluminum because it was handy, easy to work, and durable enough to last awhile. Wood or plastic would also do the job but wouldn't likely make for as long lasting a repair.

Step 4. After testing the retainer position and fit, drill a hole through the side of the vacuum (Figure 3), large enough in diameter to pass through whatever screw is to be used to fasten the retainer to the vacuum. I think it was a 10-32 machine screw in this case.

Figure 3. Drilling a mounting hole in the vacuum
Step 5. Holding the retainer in place, make a mark through the hole in the side of the vacuum to locate the place where the fastening screw will enter the retainer.

Step 6. Center punch the spot for the through hole on the retainer and drill a hole large enough to pass through whatever screw is to be used (Figure 4).

Step 7. Attach the retainer in position using a screw and a nut, but do not tighten it up all the way. If there is enough room, use a lock washer.

Step 8. Check the fit of the rotary brush and adjust the final position and alignment of the retainer for a snug fit. You should still be able to slide the end of the brush into the mount without difficulty.

Figure 4. Drilling a through hole in the retainer
Step 9. Tighten the nut on the mounting screw, and reassemble the machine. In this case, the brush ends held bearings that needed to be adjusted slightly before re-installation. This was done by simply tightening a screw on one end of the brush.

This vacuum is back in action and working great. It runs smooth and quiet and no more black marks are randomly applied to the floors. I foresee many more years of service for this machine. Not bad for a half hour of work using only parts and materials that were already on hand (See Figure 5 for how the part looks when finished).


Figure 5. The retainer in place doing its job

Wednesday, February 2, 2011

30 Days of Creativity - #28-#30

Rebuilding an Old Craftsman Lathe

Continuing on the theme of "machinery rebuilding" that I started with the minor overhaul of a vise yesterday, I decided it was high time to do something with an old (1940's or 50's maybe?) Craftsman model 109 lathe. I purchased it along with two wood lathes from a guy somewhere in Colorado Springs about 10 years ago. I knew it wasn't the greatest of metal working machines, but I hoped it would be good enough for small hobby jobs that did not require the ultimate in precision.

Just like the vise I rebuilt yesterday, this machine tool had been in storage in a musty shed for years and was covered with a thin but damaging coat of fine rust. I decided to take apart everything but the spindle, remove the rust, hone the mating surfaces, lubricate it and put it back together. I spent several hours a day on it for three days (again with the help of less than thrilled offspring).

Figure 1. Craftsman Model 109 lathe, cleaned up and ready for action
Unfortunately, I neglected to take a picture of it before the overhaul operation, but figure 1 shows what it looked like after I was done. Not bad. It works. It has proven impossible to get a good adjustment on the gibs because both the bed and cross-slide ways are worn unevenly. But, I can get it to work pretty well over any limited range of a few inches.

Using the 4-jaw chuck that it came with I was able to machine a brass test button to within about .005 inches of an arbitrary target diameter. I assume I could do a little better with practice.

I even used the lathe to turn a body blank for a scratch built rocket made out of a willow branch. I still don't have a good way to make large enough, accurately centered holes in the ends of the body for creating spaces for motor mounting and to pack a parachute, so that project is on hold until I invent some appropriate method or get access to a different machine.

I have entertained the idea of buying a 3-jaw self-centering chuck for this lathe, but I think I might just sell it and use the money to buy a Sherline or something.

Previous Day

30 Days of Creativity - #27

Rebuilding  a Vise

Again, maybe it's a stretch but today I rebuilt a vice that I have owned for many years. It was originally purchased from Harbor Freight Tools. A lot of their stuff is not very good, but this is an excellent vise. It had fallen into a state of disrepair after being stored in a damp shed for a long time. It was rusted to the point where it could not be operated. What a waste to have such a handy tool doing nothing!

Figure 1. Refurbished heavy duty vise
So, I took it apart and sanded off the rust and cleaned the lead screw. Actually I had my daughters help do certain parts of it. They have at times expressed some interest in studying science or engineering so I figured any kind of mechanical training and experience can't hurt.

After reassembling it with the addition of copious amounts of lubricant, it seemed to work pretty well. Several cycles of its full range with the addition of more lubricant (I am fond of Slick 50) seemed to do the trick and I have used this tool to great advantage many times since (see Figure 1).

A few days later I needed to hold some material firmly but gently, so I fashioned some soft jaws out of pine scraps I had laying around. They aren't pretty but they get the job done.

It's good to have this vise back mounted on the workbench instead of sitting on a dusty, damp floor in an outdoor shed.

Next Day
Previous Day

Monday, January 10, 2011

30 Days of Creativity - #26

Fixing Up a "Vintage" Stereo

My daughter bought a Wards portable stereo record player at an estate sale for $20. It is very similar to the 1964 GE 300 pictured at antiqueradios.com, so I m guessing it is from the same era. We tested it and it played pretty well. Talk about fun! Hearing some of my old albums after decades (yes decades) was just fantastic.

Figure 1. Circa 1960's Wards Airline Stereophonic Record player
There is a problem. Every so often one of the channels cuts out. Sometimes it's the left, sometimes it's the right—only when playing records. The radio never has this problem. Besides that, there were some cosmetic issues.

I was able to do the following:

(1) Replaced a stripped screw in the top handle so it can actually be carried by the handle now.
(2) Glued some loose grill cloth back in place on one of the speakers.
(3) Made new foot (one was missing) out of a new rubber foot. Sawed the new foot to the proper height using a hack saw.
(4) Glued on a piece of the vinyl covered chip board that had been knocked loose from one corner.
(5) Opened the electronics bay and sprayed some electronics cleaner into the pots and switches on the outside chance that dirt was causing the intermittent channel signal loss.

Figure 2. It's solid state man!
Figures 1 and 2 show this unit after those repairs. It still cuts out once in awhile. Quickly flipping between the radio and phono modes using the front panel switch will sometimes jolt it back into normal operation. One of these days I will delve deeper into the electronics. I still think there is a good a chance a more thorough cleaning will solve the problem.


Next Day
Previous Day

30 Days of Creativity - #21-25

Cigar Box Guitar

Figure 1. Cigar box instrument as it was.
I brought home a cigar box guitar that needed some improvements. A friend had started it and roughly finished it, and he decided to give me a shot it. It was an unelectrified, three string instrument with a very high action suitable for slide playing (Figure 1).

I worked on it over a five-day period, and accomplished the following:

(1) Made a new nut from a piece of 1/4-inch steel rod. Filed string grooves into the rod with a jeweler's file.
(2) Reshaped and sanded the neck and headstock to make it smoother and look a little better.
(3) Reshaped the sound hole to make it look a little better.
(4) Reshaped and stabilized the steel the bridge by reinforcing it with a brass backing plate.
(5) Machined a slot in the neck to hold a pickup. I purchased the pickup used from a local music store.
(6) Installed and tested pickup. It didn't work. Further investigation revealed a broken wire inside it. I couldn't fix it so I returned it and they gave me another one. It worked.
(7) Improved the string holes in the back of the neck by using three identical nuts (the previous nuts didn't match) held in place with super glue.
(8) Made a backing plate for the tuners from  thin piece of walnut. The headstock was a little too thin to properly fasten the tuners in place. Even when tightened all the way they were loose.
(9) Stained the neck.
(10) Painted the body brown since it was kind of torn up looking and did not have an attractive cigar box look.
(11) Assembled it and strung it up.

Figure 2 shows how it looked in a state of disassembly. You can see the pickup slot in the neck. Due to the through-body design of the neck this was the only way to mount the pickup. The pickup was a used single coil (made in China).

The string holes were supported in the back with steel nuts inserted and glued into the wood. The groove between the string holes and the pickup hole is where the bridge was installed. The saddle is held in place by string tension only. It works!


This is how it turned out:


Previous Day
Next Day

Saturday, January 1, 2011

30 Days of Creativity - #20

Music

When me and Colin were working on "Rotgut Highway" the other day, I had a kernal of an idea for an intro. I made recording of it (much later) with GarageBand using an acoustic guitar played through an M-Audio Audio Buddy preamp sent to the audio-in jack on an iMac. I added a drum beat just for effect.

Here it is:


It's not much but like I said, it's only an intro.

Previous Day
Next Day

Friday, December 24, 2010

30 Days of Creativity - #18-#19

Home Made Guitar Pickups

I have been interested in cigar box instruments for awhile now. Actually I have always been interested in found object as instruments. Once I recorded a song called "Robotics Man" that featured sounds from power tools and some beeps made by touching the ends of a pair multimeter leads together. That was decades ago!

I got it into my mind to make a cigar box instrument  after seeing one that the aforementioned nephew was working on. I also remember seeing John-Alex Mason play one he had made (this was a couple of years ago), and I recall him describing how he made his own pickup for it. I figured if I was going to make my own cigar box guitar, it would be cool and educational to make a pickup too.

You can't make a pickup unless you know how to get started, so my output for today and tomorrow consisted of researching how to make one (maybe a half hour each day?). I found the following resources helpful, although I haven't decided exactly how to proceed.

Make a Guitar Pickup (Instructable)

Make Your Own Electric Guitar Pickup

How to Make  a Humbucking Pickup for Guitar (The Hard Way!)

I'll admit I haven't actually made a guitar pickup even as of the end of 2010, but I have scrounged up most of the materials over time, including a roll of magnet wire I got at an estate sale for $1, so it is on my list of things to do! I think the best place to get neodymium magnets is either eBay or KJ Magnetics. Amazon sells some too.

Previous Day
Next Day

Thursday, December 23, 2010

30 Days of Creativity - #17

Music

I had already written the lyrics to "Non-Linear Dude (see Day #13) and had piddled around with some music for it. I finalized that (more or less) on this day. Then I went to my nephew's house to jam and do a little recording.

He is a songwriter and guitar player and we occasionally gt together and talk about doing some open mics together. So far its ll talk, but we still keep talking about it. On this particular day, I made a demo recording of "Non-Linear Dude" and we worked together on a few other things, including an acoustic version of "Sweet Jane."

We also worked on a song together. He always has some music he has been working on so I threw out a few lyrics and we took it from there. We even wrote them down somewhere. It was tentatively called "Rot Gut Highway" and the first few lines went something like:
Travelin' down a broken highway
The side of the road all covered with bones
Picked up a dog that was headed my way
Threw him in in the back and kept on goin'
Uh-huh.

We even recoded part of it. Come to find out later, that his computer crashed and as far as I could understand, all the work is gone. Oh well.

Previous Day
Next Day

Sunday, September 12, 2010

30 Days of Creativity - #14 - #16

Experiments with Colored Pencils

There I was in a hotel room in Orlando Florida. It was the first day of the Model Schools Conference put on by the International Center for Leadership in Education. I had come prepared with some art supplies, since I knew it would be otherwise hard to keep rolling with this 30 Days of Creativity project while on the road.

I also crazily packed a little cardboard robot model my daughter recently gave me as a gift, but I admit to not working on it at all while I was there. I was able, however, to experiment with some colored pencils and old yellow paper.

Figure 1. A first colored pencil piece
When it comes to art, my talents (if any) tend to be in the abstract realm. I had recently been playing around with ideas for how to incorporate recycled toilet paper rolls in an art project. One idea I played with a little was to cut the rolls open and attach them together to make a painting surface, create a painting, then disassemble the pieces and rearrange them in a new way. So, I decided to test some ideas that I thought might work for an eventual painting for this project.

Unfortunately, I neglected to sharpen my colored pencils before I came! I pressed on anyway and used whatever ones I could to get some sort of a line on the paper to create the swirly thing shown in Figure 1. That was my first night's work.

Sharpen Those Pencils!

The next night I made my way down to the lobby and looked around the business center for a pencil sharpener. No luck. What kind of a business center in a major hotel doesn't have a pencil sharpener? Plan B.

Figure 2. Drawing is better with sharp pencils
I approached the registry desk and asked one of the employees if they happened to have a pencil sharpener I could use. One of the kind persons went to the back office area and returned with a basic electric model. She plugged it in for me and I proceeded to sharpen away. I was able to get about 90% of them sharpened before the sharpener seized and would sharpen no more.  I returned the device with a "thank you," pretty certain it would come back to life once it cooled. Back to the room.

More Experiments With Colored Pencil


That evening and the next, I tried variations on the theme I had begun the night before (Figures 2-5). These came out better since the pencils were sharp(er).

Figure 2 was really nothing more than a test of how smoothly I could move the pencil tip over the surface of the paper. It is really quite amazing how the brain and hand can improve the performance of such a simple task in a short time. By the time I was done, my movement was much more steady and he sweep of eth curves much smoother compared to when I started

Figure 3. Use of overlapping lines

Figure 3 is okay. It included a deliberate crossing of one swoop over another. just to guage the appeal of that effect.

These are just free form experiments with colored lines. It was a lot of fun and I am sure I learned something from the process, although exactly what is hard to say. Just because I can't quantify it, or pin it down, doesn't mean it doesn't have some value. At least to me.

I like Figure 4. This included a deliberate attempt (only partially successful) to not allow any of the swoops to cross over each other. I added some background to it just to see what effect it would have on the overall look. It seems to work.

Of these I do not much care for Figure 5. It looks too mechanical; like it was drawn with a machine of some sort. It's like something produced by a Spirograph.
Figure 4. Trying not to cross the lines

Great art? Probably not. But, interesting enough to make me think something along these lines, done in more vibrant colors with acrylic paint, would work well for the toilet paper roll piece I had in mind (more on that later). 
Figure 5. A spiral, more symmetrical design

Previous Day
Next Day

Saturday, September 11, 2010

30 Days of Creativity - #13

Song Writing

I have had a few lines of a song floating around in my head for, oh, I'm guessing probably about a year now. I decided (not having any other ideas at the moment) to sit down and try to use that kernel of an idea to write a full fledged lyric. You know saying, attributed to Chuck Close —"Inspiration is for amateurs. I just show up and get to work." The name of the song is "Non-Linear Dude".

Non-Linear Dude

Sitting in a corner, staring at lines on a page
Does it go up? Does it go down?
Why don't it ever, com back around?
I wish I woulda' payed attention that day

Rise over run, or is it run over rise?
Δy over Δx, all they said was "follow the steps"
They said it's  easy but ...
Might as well be fighting a T. rex

                    (bridge)
Some day soon, I'll be on a job interview
The manager will shake my hand, say "how do you do?"
She'll ask about my future plans, what I wish for and hope
Pretty sure she won't ask me, if I can calculate a slope
                    (end bridge)

The world keeps on turnin', there's  a constant rate of change
y = mx + b, I can count to ten, I can't count to b
What the hell is m?
Not sure what quadrant I'm in

They say I got to understand, the equation, table and graph
Been' tryin' to find the y-intercept, try as might, ain't found it yet
I might as well go out and play
Cuz I ain't never gonna' use this anyway


Sitting in a corner, staring at lines on a page
                    (fade)

Yeah I'm a math teacher. I guess this song reflects my frustration about the disconnect between what kids need to learn  (invention, creation, and "how to learn"), instead of what is usually taught, which is to be rule and procedure followers.


Previous Day
Next Day

Tuesday, September 7, 2010

30 Days of Creativity - #12

Paper Crafts

Figure1. Starting an origami triangle
Today was a day to try some paper crafts. I had recently gotten a couple of books from the library—one on paper tessellations and one on origami. It was time to try something from each. It ended up being  a family affair, with my daughters trying their hands as well.

Origami Triangle, Origami Pyramid

Not being in an overly ambitious mood, I made a simple triangle out of a square piece of paper (Figure 1). Big whoop. Realizing that was not very impressive, I proceeded to a three sided pyramid. Big Whoop!

Tessellated Paper

Figure 2. Old and interesting gummed paper
This was actually more interesting, and was tackled by the girls. I had recently obtained some very interesting gummed paper at an estate sale and hadn't come up with a legitimate gummy use for it yet, so we figured, "what the heck." It has an interesting fuzzy texture, but turned out not to be ideal for the purpose (Figure 2). It does not hold a crisp edge, which is necessary to get a large number of precise folds into it. I also tears too easily.

But, somehow they got it to work and produces the attractive curved shape shown in the middle of figure 3. Figure three also shows the origami pyramid.

Figure 3. Triangle, tessellation, and pyramid

The tessellation book recommends mulberry paper, which apparently is very tough and holds a crease well. It also happens to be fairly expensive (although you can get a deal on some on eBay). If we ever decide to get seriously into tessellating paper (not likely) it would be worth the investment. Some of the creations shown in the book are pretty amazing though.


References

Montroll, John; Origami Polyhedra Design; Wellesley, MA: A K Peters, 2009

Gjerde, Eric; Origmi Tessellations: Awe-inspiring Geometric Designs; Wellesley, MA: A K Peters, 2009
Next Day
Previous Day

Tuesday, August 31, 2010

30 Days of Creativity - #11

Waxing a Walking Stick

I was pretty desperate for something on this, day eleven of my 30 days of creativity. Fortunately, I was able to come up with something. The previous project (Moleskine-like notebook) involved the use of some beeswax that I had previously misplaced. Now that I knew where it was, I could put the final finish on a project I started over six months ago.

Figure 1. Rubbing on beeswax
Some years back, I had collected some branches from a willow tree growing near a pond in Falcon, Colorado. These branches are relatively straight and are now well-seasoned. They are just about the right diameter and length to be made into walking sticks. I have made two such walking sticks, the most recent one earlier in 2010. All it needed was some kind of a finish coat.

Figure 1. Melting beeswax with a heat gun

I prefer natural finishes on my walking sticks and previously had good results with beeswax. I think I read about doing that in a book somewhere. The beeswax feels good in the grip (ever so slightly sticky, but not too much) and gives the wood a subtle but pleasant luster. Sooooo, I got out the old beeswax and rubbed it all over the surface of said walking stick. It almost looked good. Almost.

Figure 3. Willow walking stick
Heating the Beeswax

You see, cold beeswax does not spread evenly on wood so the surface of the stick was covered with little globules of wax. Rubbing the stick hard with the palm of my hand to warm the wax did distribute it a little better, but not very well.

It was some time later (a couple of months) that I hit upon the way to get it to look good. I heated the wax with a hot air gun and that melted it it right away, distributing it evenly and in a very thin coat all over the stick. This heating process darkened the wax it slightly too, giving the walking stick a nice warm look. Done.

I might even make some more of these and sell them for ten or twelve bucks on Craig's List. I must have at least a dozen more branches of suitable dimensions for some pretty cool walking sticks.

Since revisiting my willow supply I have also tried turning willow on a lathe and it comes out well. It is light and easy to work material.

Sunday, August 29, 2010

30 Days of Creativity - #8, #9 and #10

Sounds easy doesn't it? Make something everyday for 30 days. Sheesh! (Note: My posts went into a hiatus because my images stopped uploading, but now they are working again).
The Moleskine-like Notebook Project

I love my 32-page Moleskine notebook. Is that pronounced like "skin" or like "skyne"? I don't know. I've seen several described projects for making various kinds of notebooks. I had previously stashed away some materials with which to make one, so today is the day I begin.

Figure 1. Notebook cover cut from an old grade book
I began by tracing the outline of my trusty Moleskine onto a piece of vinyl-like plastic materiel I salvaged from a no-longer-used teacher grade book. In a world of computer grade-keeping does anyone use those anymore? It was probably several months ago I was cleaning up and found it and immediately recognized that that material was ideal for making a notebook cover.

After tracing the shape I cut it out with scissors and free-handed the rounding of the corners. Looks okay!

Using the same Moleskine original cover I layed out a pattern for the pages on a piece of ghost grid archival graph paper for scientists and engineers that I had purchased at an Edward Tufte seminar several years ago. Good stuff that.
Figure 2. The cover material, paper and a Moleskine notebook
to use as a model.

Cutting the paper was tricky because it is hard o get them all the same size when cutting free-hand, and the edges get sort of rough when trying to cut too many at once with less-then-sharp scissors. I have no paper cutter. Again I free-handed the rounding of the page corners, with less than stellar success but I am not done yet!

Figure 3. Drilling the binding holes.
After putting the pages and the cover together I set it up on  drill press and drilled holes for the string to pass through for the binding. I used some black hemp cord coated with beeswax and a curved needle to run the thread through the holes. This comes out looking quite similar to the Moleskine binding, but the hemp I used is a bit thicker. A thinner hemp cord would work better.

All in all, it is a pretty reasonable substitute for a Moleskine and I think it will serve well as a highly portable pocket note keeping device.

Figure 4. Sewing the binding with waxed hemp cord.
Figure 5. The notebook compares well with a real Moleskine.

Next Day
Previous Day

Thursday, June 10, 2010

30 Days of Creativity - #7

Progress has slowed. However, I have done a few things in preparation for upcoming projects. One problem I have to deal with is the fact I will be traveling to a conference soon and will have to have some sort of portable project(s) to keep the creativity plan going for several days away from home.

Soma Cube Project

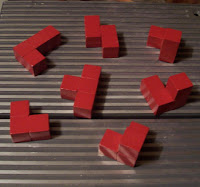
Today I put on two coats of clear acrylic as a final finish (Figure 1). They came out pretty well. Nice and shiny. And red. To top it off I solved the puzzle (Figure 2). It took me about three minutes. Maybe I just got lucky.

Finished Soma Cube Pieces
Figure 2. Finished pieces of the Soma Cube
Assembled Soma Cube
Figure 2. Assembled Soma Cube


Blogging

On a related note (sort of) I have figured out how to add captions to images in Blogger (see Figures 1 and 2!). There is a lot of information about how to do this on the web. Some ideas work, and some don't so I figure it might be helpful to write a clear explanation of a couple of ways to do it that definitely work. That will be written up elsewhere.

Monday, June 7, 2010

30 Days of Creativity - #6

The Soma Cube Project

It's almost done! Today I put two more coats of red paint on the pieces. Tomorrow I will put on a couple of coats of clear acrylic and it should be ready to solve!

Blogging

Today was the day I got the right sidebars on this blog set up pretty close to the way I want them.

Not much else. It still counts!

Sunday, June 6, 2010

30 Days of Creativity - #5

The school year is over and I should have more time to do fun stuff now!
The Soma Cube Project

Okay the primer is on. It's oil based light gray paint from a spray can. That stuff is amazing because it has been on the shelf for at least five years and it's still good. However, the topcoat red is not oil based. I do not think that will be a problem so long as I let the primer dry well before applying the finish coats.

I put on two coats so the graininess of some of the wood surfaces would not be so obvious. The paint also tends to fill some of the gaps between the cubes as well. Dang I forgot to take a photo of the primed pieces!

Technical Writing

Writing is also a creative process, even it it is non-fiction writing. I recently became a feature writer at Suite101.com for the science/tech books section. That means I have an obligation to post four articles a month that somehow relate to science/technical books. So far so good. I wrote up a review of Quantum Leaps by Jeremy Bernstein. Overall, I liked it.

As a Feature Writer, I also get a blog there as well. If you've got blogs use 'em I say. I wrote a piece on a pretty good technical book series called What Every Engineer Should Know. Good stuff in that series. In blogs you get to be quite a bit more creative in your writing style than you do when writing a book review to conform to site style. Does this count as part of 30 Days of Creativity? You bet!

Sixty Days in a Library

Here is a long-term personal learning project that I started today. It involves lots of reading and research, but the creative part for the purposes of 30 Days of Creativity is that I wrote a blog post about it. In Sixty Days in a Library I outline my plan to become skilled in the art and science of information theory with application to problems in biology. You should try something like this too!